Queen Rearing should be standard practice for any beekeeper with a couple of seasons experience. Relying on imported queens to requeen your colonies could spread exotic pests and diseases into the UK and provide you with bees that have poor local adaptation.
The only reason you should purchase queens from outside of your area is to bring in characteristics that your bees don’t have, like a gentle temperament or reduced swarming instinct. Most likely, if you breed from your best colony each season, you will soon have bees that suit your purposes, and you can proudly distribute spare queens to your beekeeping neighbours.
Keeping good hive notes will help you keep track of your best colonies, you should record:
- Behaviour: How easy they are for you to handle during inspections, do they sting or follow? Do they run on the frames or remain calm?
- Health: Are they free from disease? Do they tolerate Varroa Mite and Deformed Wing Virus well? Do they have a good brood pattern with few gaps?
- Their ability to bring in excess stores: Do you get a honey crop off them? Did you have to feed them during the season? How much syrup did they need to survive the winter?
- Did they swarm or make swarming preparations? While swarming is a natural process, excessive swarming is inconvenient, and can lead to colonies that are less able to survive the winter without lots of beekeeper intervention.
The most common months for queen rearing are May, June and July as the weather is more reliable, however, you can start queen rearing any time there is capped drone brood in your healthy colonies. The queens will mate with drones from other hives, preferably those not related to them. If you have capped drones in your hives, you can be sure your neighbouring beekeepers do as well!
Gather your equipment well in advance so you are not rushing to get everything ready at the last minute.
There are many methods of queen rearing, the Miller Method requires very little additional equipment and no grafting, so it is easy for a first attempt, many beekeepers use this, or their own version of it, as their preferred queen rearing method. Do not be disheartened if you are not successful at your first attempt. There are many variables. Try again and perfect your own queen breeding method.
This method should give you an average of 5 queen cells, but up to 15 have been known.
In the Apiary
- The best Colony, with good temperament, disease free, and very low varroa count, the Breeder Hive.
- One colony made up into a double brood, also disease free with minimal varroa. The Cell Builder hive. Ideally this should be a colony with an older queen. This will encourage the bees to rear the queen cells.
Preparing the Miller Frame You will need: A Brood Frame, either fully or part drawn and a pair of wire cutters. Or An empty Brood Frame, and a sheet of unwired foundation. Place the drawn comb brood frame on a cutting board and, using a sharp craft knife, cut the comb length-ways, halfway up from the bottom bar in a Zig Zag pattern, using the Wire Cutters to snip the wires in the foundation.
Additional Equipment Needed
|
|
.jpg "Claoke Board")
- 3 to 5 frame nucleus hives, commonly called nucs. (often the Cell Builder colony is split into queen raising nucs, creating around 4 to 6 nucs)
- A stand or stands for the Nuc boxes.
- A wooden board large enough to make a ramp up to the second story of the double brood colony.
- Weak Syrup or commercially prepared inverted syrup for bees.
- Pollen patties for the Queen Raising Nucs. Or frozen brood frames of pollen, from disease free colonies.
Preparing the Miller Frame
You will need:
- A Brood Frame, either fully or part drawn and a pair of wire cutters. Or
- An empty Brood Frame, and a sheet of unwired foundation.
Place the drawn comb brood frame on a cutting board and, using a sharp craft knife, cut the comb length-ways, halfway up from the bottom bar in a Zig Zag pattern, using the Wire Cutters to snip the wires in the foundation.
.jpg)
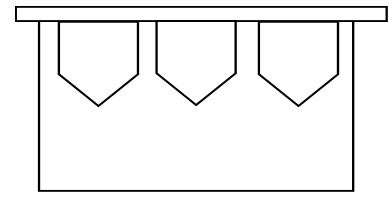
Or - Place the sheet of foundation on a cutting board and cut out 3 pennant shapes, making sure the pointed end of the pennant shape is cut so the hexagonal cells are the right way for the bees (pointed corners up and down, not the flat sides)
.jpg)
.jpg)
Using a little melted wax to help fix the pennants in place, fix the foundation pieces to the top part of the frame. Pin in the wedge piece of the top bar to secure the foundation in place. They will still be a little fragile, so will need careful handling.
Placing the Miller Frame in the Breeder Hive
Re-organize the breeder hive, Make a space in the centre of the colony for the Miller Frame. If a frame of stores is taken out to accommodate the Miller Frame, freeze it for later use in the queen raising nucs. Place brood combs either side of the Miller Frame containing lots of eggs and young larvae. Make sure there are plenty of pollen stores in the hive and feed with weak sugar syrup or commercially prepared syrup.
.jpg)
The Morning of Miller frame harvest day. Breeder Hive
The queen should quickly lay in the drawn comb, but it may take an extra day or two for foundation to be drawn. With drawn comb, check after 3 days, with foundation check after 4-5 days. Harvest the frame once there are eggs laid in the lower part of the Miller frame. The rest of the timings will be judged from the day of harvesting this Frame.
Open up the breeder hive colony and check on the Miller Frame, there should be lots of eggs. If you are not great at seeing eggs, take a magnifying glass with you. Once you are sure there are plenty of eggs laid in the frame. Replace the frame of eggs in the breeder hive and put the hive back together until the afternoon.
Now set up the Cell Builder hive ready to take the cells in the afternoon. The receiving brood box will need to have been queenless for several hours before transferring the eggs.
The Morning of Miller frame harvest day
Setting up the Cell Building Colony
- Setting up the cell builder hive ready to receive the eggs: Strip the hive down so you have the bottom box open in front of you and the top box beside it on the upturned roof. Turn the bottom box and floor so the entrance now faces the opposite way, make sure this is left open so the bees can fly from here. Find the Queen and place her in a queen cage, or simply make sure she is in the bottom box. Set up the bottom box with laying space for the queen, capped brood and sealed stores
.jpg)
- The top box should be set up with no queen, open stores at the outside of the brood nest, and frames containing very young larvae either side of the Miller Frame, this will mean there are lots of nurse bees in the top box
- Place the Cloake board on top of the bottom box, board in, with the entrance facing the direction of the original hive entrance. Place the prepared Second Brood Box onto the Cloake board and put on the ramp board so the returning foraging bees climb up to the Cloake board entrance.
.jpg)
- Add a feeder eke, or super with a rapid feeder on top of this second box. Close up the hive. This top box is now queenless.
Miller Frame Harvest Day
Five to Six Hours After Setting Up The Cell Builder
- The cell builder hive’s top box has been queenless for 5 to 6 hours.
- Open the Breeder hive and take out the Miller frame.
- Look at the lower edges of the Miller Frame and find the eggs in the cells. Using a hive tool along the lower edge of the frame, remove two out of every three cells, making sure the intact cell contains an egg. this should leave a sort of castellated edge to the bottom of the frame, this is so that the queen cells made from the remaining eggs will be easy to remove and place in the nucs.
.jpg)
- Place the Miller Frame in the centre of the cell builder hive, where the space was left earlier. The bees may be defensive due to the loss of the queen.
- Feed the colony with weak syrup and pollen patties.
Place a frame of foundation at the edge of the brood nest in the Breeder Hive, to replace the Miller Frame. This hive can be managed as normal for the rest of the season.
The Breeder Hive can be used again for breeding in a later part of the season. Many queen breeders like to rear queens in July, so they have fresh young queens to requeen hives ready for the winter.
Two days after the Miller Frame was Harvested
- Check that Queen cells have been started on the miller frame. The cells will have started taking on the classic queen cell shape, drooping downwards on the comb.
.jpg)
- Remove the slide from the cloake board so the colony is now queen right, but the queen is still separated from the top box by the queen excluder. This means she will not be able to damage the queen cells in progress. Better queens are reared from queen right colonies, rather than emergency queen rearing impulse from a queenless, stressed, hive.
- Two days after this, check the rest of the top box to make sure there aren’t any scrub queens being reared from older larvae in the other brood. These queens, reared from older larvae, would emerge early, and likely kill all the queens being reared on the Millar Frame, they would also make poor queens as they will have worker characteristics from being fed a worker diet for a time before reverting to the rich queen diet.
- Continue topping up with syrup and pollen patties.
10 or 11 Days after the Miller frame was harvested
Cells are best moved into Queen Raising Nucs on day 14 of the queen’s development from egg to adult. If you wait too long, the queens will start to emerge and the Virgin Queen will fight or leave in cast swarms, if you move them too early, you risk damaging the queen development and the resulting queens will be less able to mate and thrive.
- Get the nucs prepared either the day before, or a few hours before transferring the queen cells, the bees will have to know they are queenless to want to take care of their queen cell.
- The nucleus hives need to be set up with plenty of stores and a couple of frames of brood, with plenty of young bees, and a feeder ready to be filled. If you are using frozen frames of stores, make sure they are at room temperature before they are put into the nucleus hives.
- The frames, stores and brood can come from any disease-free hive. The adult bees shaken into each nuc should all be from the same hive; this will prevent any risk of fighting within the nuc box.
.jpg)
If you are using your Cell Builder colony, make up the nucs as instructed above, placing the old queen in one of the nuc hives. Place the nucs in a circle around the original hive location and face the entrances inward, the flying bees will find their way to one or other of the nucs.
Harvesting the Queen cells
Cut generously around the queen cells so you don’t risk damaging the queen within, and you have a wide top to anchor the queen cell within your nuc. Handle your cells carefully, the developing queen can be easily damaged.
.jpg)
|
|
.jpg)
- There is a slight risk the worker bees will attempt to damage the queen cell so you will need to protect it. To do this make a cone out of tinfoil, with a hole at the pointed end so the queen can emerge without hinderance from the tip of the queen cell. Place the queen cell between the middle two frames, hanging down from the top of the top bars.
- Leave these little colonies to rear their new queens, making sure they have plenty of food. Don’t disturb them too much, just keep an occasional eye on the entrances to make sure they are flying and bringing in pollen.
- The Queen will take her mating flights around 21 to 31 days after her egg was laid. The Queens and Drones mate on the wing, and the queen will mate with several drones on possibly more than one flight. This is a crucial time for the weather to be fine and the queen may not mate at all if the weather is poor during the whole of this mating window. If she is not mated, she will become a drone layer.
- Remember that the new queen will not start to lay her own eggs till 50-59 days after her own egg was laid.
Adapted from - Miller Queen Rearing Workbook pdf (issued January 2022)
Crown copyright 2020 - www.nationalbeeunit.com here used under the terms of the Open Government Licence (OGL)
